
Velero and vSphere – Part 1
It has been a while since I wrote something in the space. This one has been long overdue.
Almost all enterprises are slowly migrating their workloads to cloud native spaces, either on-prem or on the cloud. There are many external factors that aids the decision making process of whether the cloud-native applications are going to be hosted on-prem or on the cloud. For the context of this blog, we would specifically talk about VMware’s on-prem Kubernetes Solution, vSphere with Tanzu also previously known as vSphere with Kubernetes or Project Pacific.
VMware vSphere with Tanzu has been consistently doing well in terms of adoption and the primary reason being the flexibility it provides to vSphere administrators to provision and operationalize Kubernetes clusters and objects such as vSphere pods. One important aspect would be the ability/flexibility to backup and restore the setup in the event of a failure.
Though vSphere with Tanzu calls for a lengthy (complicated 🙁 ) restoration process including restoration of vCenter/NSX appliances, for the context of this blog series, we would only look into restoring a vSphere Pod that’s running on a supervisor cluster enabled on vCenter 7.0.
I have written about enabling workload management here.
Velero Pre-requisites:
- Workload Management on the cluster is enabled with NSX-T as the network provider
- Availability of an S3-compatible object storage location to backup and store vSphere pods and guest clusters.
- Supervisor Cluster version 1.21.1 or later
Procedure:
As a first step, we will setup MinIO which is an S3-compatible object store which is easy to install and use. I will be using a Linux VM to bring up my MinIO instance. However, MinIO can also be installed as a stateful service on the supervisor cluster starting vSphere 7.0 Update 3. Please refer to the official documentation for this procedure.
To install MinIO, we first login to the ubuntu machine. I will be using Ubuntu 20.04 for this demo.
Step 1: Download the MinIO binary from its official website using the following command:
wget https://dl.min.io/server/minio/release/linux-amd64/minio
Step 2: You should see a file named minio in the location from where the download was initiated. Let’s change the file to be executable using the following command:
chmod +x minio
Step 3: Let us move the file into the /usr/local/bin directory.
mv minio /usr/local/bin
Step 4: To avoid running MinIO as root user, we create and grant necessary permissions to a user that we create for this purpose using the following commands:
useradd -r minio-user -s /sbin/nologin
chown minio-user:minio-user /usr/local/bin/minio
Step 5: Let us create a directory which store all the data (buckets that will be used for backups)
mkdir /usr/local/share/minio
chown minio-user:minio-user /usr/local/share/minio
Step 6: Create MinIO configuration file under /etc directory
mkdir /etc/minio
chown minio-user:minio-user /etc/minio
Step 7: Let us create a few environment variables to modify the default values by editing the following file and adding the contents below. Save and close the file once the content below is added.
vi /etc/default/minio
MINIO_ACCESS_KEY="<YOUR_DESIRED_USERNAME"
MINIO_VOLUMES="/usr/local/share/minio/"
MINIO_OPTS="-C /etc/minio --address <YOUR_VM_IP>:9000"
MINIO_SECRET_KEY="<YOUR_DESIRED_PASSWORD"
Step 8: Let us configure MinIO as a service using a startup script that you can download using the below command.
curl -O https://raw.githubusercontent.com/minio/minio-service/master/linux-systemd/minio.service
You should see a file named minio.service in your directory now. Let us move the file to systemd directory now before enabling the service.
mv minio.service /etc/systemd/system
systemctl daemon-reload
systemctl enable minio
At this point, you should see the following output which confirms successful installation:
Output
Created symlink from /etc/systemd/system/multi-user.target.wants/minio.service to /etc/systemd/system/minio.service.
Step 9: Enable and start MinIO Server
systemctl start minio
systemctl status minio
Now you should see the service to be “Active“
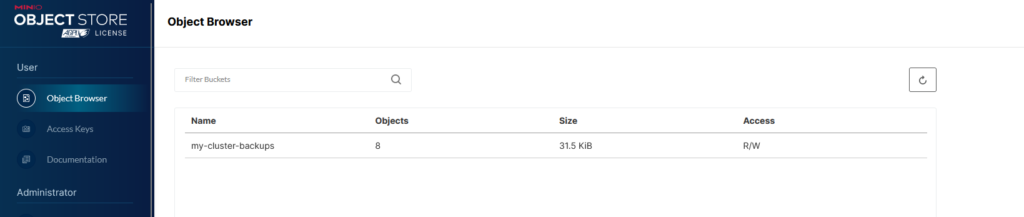
Step 10: You should now be able to login to the UI using http://<YOUR_IP_ADDRESS>:9000 and the credentials specified in Step 7. You should be able to see something like the one in the image below. Since I already have a bucket named my-cluster-backups, its shown on the Object Browser page.
That concludes the MinIO installation and my first blog in this series. I would cover installing and enabling vSphere Operator in my next blog.
Happy learning!
0 Comments